
SciForge API: Bring it all together
The point of the training program is to facilitate the setup of the development environment, and to then develop changes. There is an assumption that developers are familiar with the publicly available technologies that the product is based on, such as GraphQL and typescript.
This final module demonstrates building a new endpoint by way of an hypothetical example. Everyone is a little different in how they approach problems; this example is meant to demonstrate the relevance of prior training as the scenario unfolds.
- Hypothetical User Story
- Implementation
- Assumptions
- Strategic Plan
- Elab User Inputs
- SciForge Code Analysis
- Models
- DB repository
- Plugin Development Plan
- Organization
- Testing
- Plan Execution
- Errors
- Testing
- Promotion to production via the Plugin Pipeline
Video: SciForge API Plugin Coding Example
Hypothetical User Story
A laboratory has recently started using the ELab LIMS for production operations. Laboratory management would like to see a BI dashboard that includes a variety of metrics, in an existing internal company web portal The laboratory calls that internal portal “ICWP.” The first metric requested is a graph of the number of samples received each month, for the last 6 months.
The laboratory has only a single location. If multiple laboratory locations were present, then it would have been prudent to have asked the laboratory manager if they wanted receiving volume for each location, or if a single graph would be used to aggregate across all locations.
Implementation
Assumptions
- A working ELab instance is available
- A SciForge development environment with plugin is running.
Strategic Plan
- Determine where in the ELab database the received date for a sample is located.
- Determine which existing objects in SciForge may be used directly, and which need to be built, up to and including existing endpoints.
There are a couple of strategies that an endpoint for the desired metric might take.
- A list of all samples, with their received dates could be provided, and aggregation would occur by the application consuming the data (ICWP).
- The SciForge GraphQL query could return aggregated data by month.
The preferred strategy is the latter, since that minimizes the amount of data that needs to be communicated from the SciForge API to ICWP.
Elab User Inputs
The developer communicates with the lab to determine where received dates are entered. Users describe the process as follows, demonstrating the screens they are using:
- Laboratory request is emailed letting receiving personnel know that samples are will be arriving several days from today, and provides a tracking number
- Receiver logs in. With only a single location, the location is auto-selected.
- Receiver enters a sample group (may be called requisition, project, etc). Multiple samples are input for that group, matching the information in the email.
- Several days later, the samples arrive in a box. The receiver logs in and verifies the accuracy of all information that was pre-entered. Any discrepancies are addressed.
- The receiver then navigates to the list page showing sample groups that have not yet been received, selects the correct sample group, and clicks the “receive” button:

- So far, this is useful information. The developer now knows that a sample may not be received the same day it is created. However, the question is raised - is the received date associated only with the group?
- The receiver then changes the filter to demonstrate where the information appears for them, and selects the recently received sample group. The developer is shown both the group and the samples on the group, finding that a received date is present in both places.
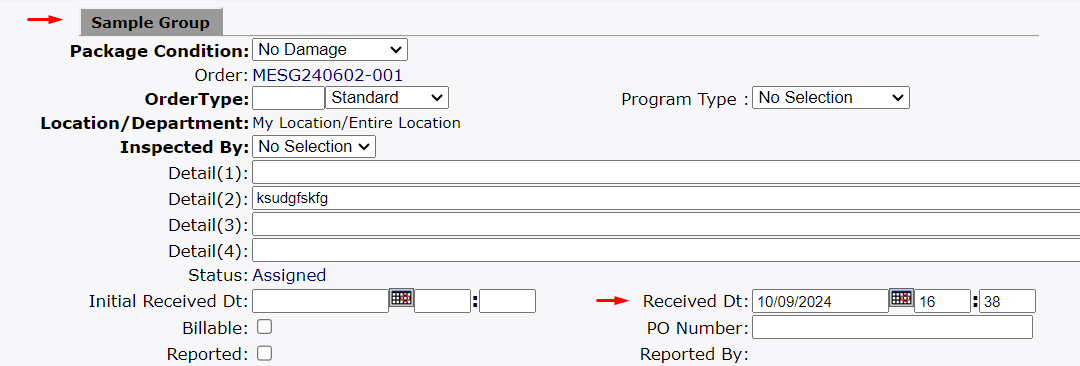
After some thought, and input from laboratory, the developer decides that the received date on the sample is the appropriate field to use.
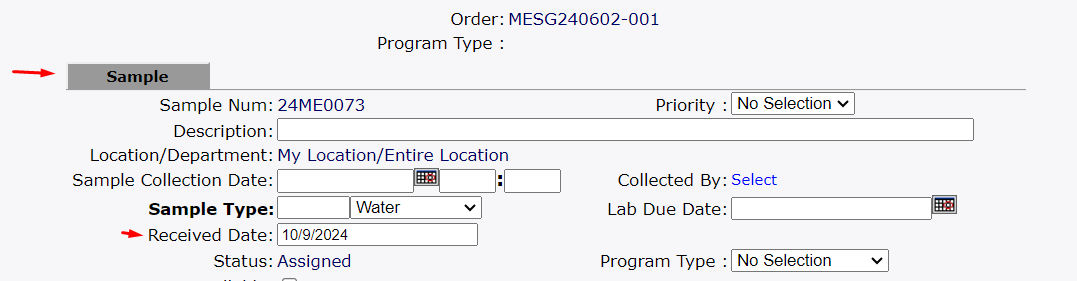
Having remembered the Elab training that focuses on how to find the relevant table, the developer does two things:
- Right clicks on the sample screen to look at frame source. He discovers that data is obtained from “sysTableEdit.Asp?Table=GEN_vuSAMPLEDETAILS” by examining the URL.
- Inspects the Received Date field on the sample, and finds that the underlying field is SAMPLERECEIVEDDT.
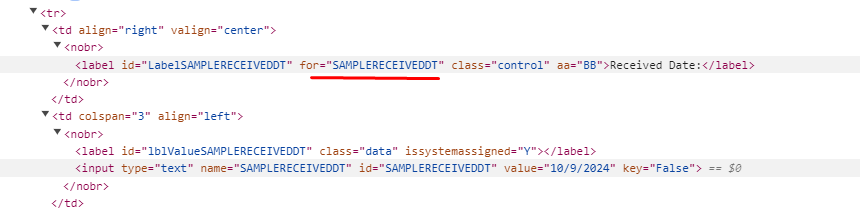
The naming convention of the table in the URL tells us that the data is coming from a view. Opening that view in Sql Server Management Studio, it is found that:
- SampleReceivedDt is stored in LIM_SampleDetails.
- The primary key for LIM_SampleDetails is SampleID.
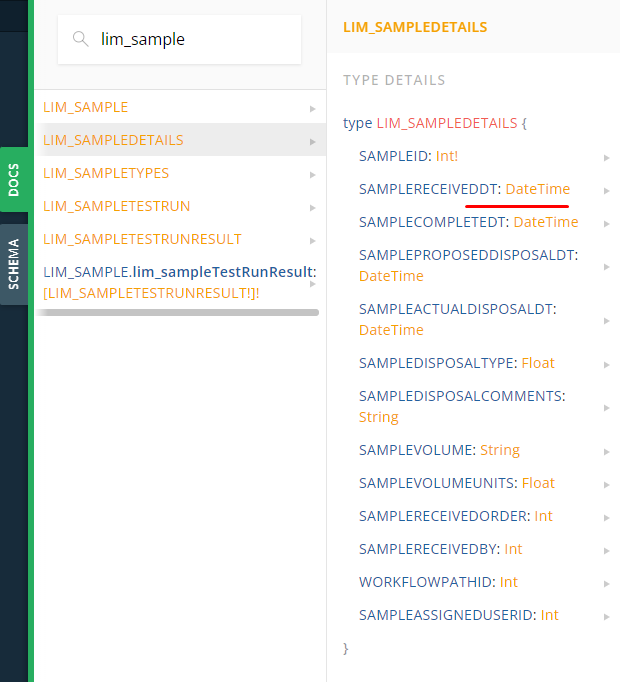
SciForge Code Analysis
Models
The training on Code Architecture informs us that there should be a model that matches the LIM_Sample database table. We can look for it in one of two ways:
- By examining the source code (under src/typeDefs).
- By filtering for LIM_Sample in the docs portion of the GraphQL sandbox
On looking, we find that the model does exist:
DB repository
We need to get data from LIM_SampleDetails, and the architecture training suggests that the “repository” model is used for database access.
In looking at source code, src/modelServices, we see a repository interface:
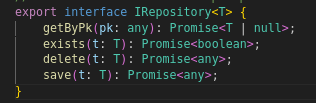
And, under src/modelServices/repos, we find that LIM_SAMPLEDETAILSRepo.ts implements that interface. Unfortunately, the repository class does not yet implement a method that provides data base on a date range.
The development effort will need to implement a new repository function that takes a date range. A custom implementation of the iRepository interface in the plugin for sample details would be consistent with the architecture.
Since the repository function that is needed does not exist, it can be safely assumed that suitable GraphQL queries do not exist, nor anything in the application services layer.
Plugin Development Plan
Having determined where the data is located, and that several classes need to be developed, the developer outlines what, specifically, those new classes will be. This will be the first endpoint created specifically for use by the “ICWP” application.
Based on code architecture, and comparison to other code, it is determined that the needed methods or classes will have the following purposes.
- getSampleRecdVolByMonth: GraphQL query method to be used by ICWP
- Ensure errors are logged
- Authentication is a must
- getSampleRecdVolByMonthInput: A model for the inputs expected from the GraphQL query
- getSampleRecdVolByMonthOutput: A model for the outputs that will be provided to the ICWP application.
- LIM_SampleDetailsController: An application services layer class supporting data mapping between database and GraphQL query.
- LIM_SampleDetailsPluginRepo: Sequelize database querying that extends existing repository and will initially have one new function to support the desired GraphQL query
The classes will include descriptive documentation when examined in the GraphQL sandbox.
Organization
The plugin folder, currently has this directory structure:
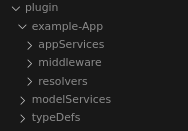
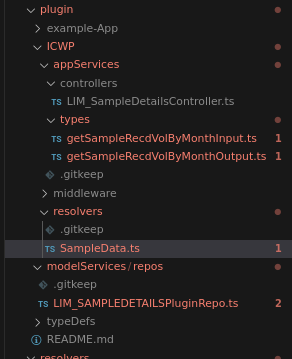
Based on this, we will copy “example-app” to a new folder for “ICWP.” The classes will be organized as:
- plugin/ICWP/resolvers/SampleDataPlugin.ts
- method: getSampleRecdVolByMonth
- plugin/ICWP/appServices/types/getSampleRecdVolByMonthInput
- plugin/ICWP/appServices/types/getSampleRecdVolByMonthOutput
- plugin/ICWP/appServices/controllers/LIM_SampleDetailsController.ts
- method: getRecdVolByMonth
- plugin/modelServices/repos/LIM_SampleDetailsPluginRepo
- method: getRecdVolByDateRange
Note that class names are chosen so that future requirements that get data from the database table LIM_SampleDetails can simply add methods to the existing classes.
Testing
The GraphQL Sandbox will be used to verify that
- We get the expected data
- That the query requires authentication
- That the query is suitably documented.
Plan Execution
- The latest plugin code is pulled, using git
- A new development branch is created and checked out for the changes that will be made in the plugin
- The dev environment is brought up (see starting and stopping module)
- The code is developed. The final files and state of the code is shown below.
File structure:
Code:
Start with a way to get data from the database.
- LIM_SAMPLEDETAILSPluginRepo.ts
- We take advantage of the ORM, rather than directly writing a database query. We chose to let the database aggregate the grouped data, rather than getting a large list and iteratively counting in typescript. Since the desired output are year, month and count, and none of these are fields on LIM_SampleDetails, we need a data model that can accommodate this.
- We have extended the off-the-shelf LIM_SAMPLEDETAILSRepo so that we can add the method we need
import { LIM_SAMPLEDETAILSRepo } from "../../../modelServices/repos/LIM_SAMPLEDETAILSRepo";
import { LIM_SAMPLEDETAILS } from "../../../typeDefs/tables/LIM_SAMPLEDETAILS";
const { Sequelize } = require('sequelize');
export class SampleRecdByVolData {
    year: number;
    month: number;
    count: number;
    public constructor(init?:Partial<SampleRecdByVolData>) {
        Object.assign(this, init);
    }
}
export class LIM_SAMPLEDETAILSPluginRepo extends LIM_SAMPLEDETAILSRepo {
    public async getRecdVolByDateRange(beginDt: Date, endDt: Date)
      : Promise<SampleRecdByVolData[] | null> {
        const data: any[]  = await LIM_SAMPLEDETAILS.findAll({
            attributes: [
                [Sequelize.fn("YEAR", Sequelize.col("SAMPLERECEIVEDDT")), "year"],
                [Sequelize.fn("MONTH", Sequelize.col("SAMPLERECEIVEDDT")), "month"],
                [Sequelize.fn("count", "*"), "count"]
            ],
            where: {
                SAMPLERECEIVEDDT: {
                    [Sequelize.Op.gte]: beginDt,
                    [Sequelize.Op.lte]: endDt
                }
            },
            group: [
                Sequelize.fn("YEAR", Sequelize.col("SAMPLERECEIVEDDT")),
                Sequelize.fn("MONTH", Sequelize.col("SAMPLERECEIVEDDT"))
             ],
            order: [
                [Sequelize.fn("YEAR", Sequelize.col("SAMPLERECEIVEDDT")), 'ASC'],
                [Sequelize.fn("MONTH", Sequelize.col("SAMPLERECEIVEDDT")), 'ASC']
            ]
        });
        //console.log(data);
        let return_data = new Array();
        for (let i = 0; i < data.length; i++) {
            return_data.push(new SampleRecdByVolData({
                year:data[i].dataValues.year,
                month:data[i].dataValues.month,
                count:data[i].dataValues.count
            }));
        }
        //uncommenting will show log in sudo docker service logs <service>
        //console.log(return_data);
        return return_data;
    }
}
When the ICWP application utilizes the GraphQL query, we will need to have data models for the inputs and outputs.
- getSampleRecdVolByMonthInput.ts
- The type-graphql library lets us decorate the class and properties with GraphQL attributes
- A description is provided that will appear in the GraphQL sandbox documentation
import { Field, InputType } from "type-graphql";
@InputType({description: "Inputs for the getSampleRecdVolByMonth query"})
export class getSampleRecdVolByMonthInput {
  @Field({nullable: false})
  beginDt: Date;
  @Field({nullable: false})
  endDt: Date;
}
- getSampleRecdVolByMonthOutput.ts
import {Field, ObjectType, Int} from "type-graphql";
@ObjectType({description: "Model for output from getSampleRecdByMonth query. The LIM_SampleDetails model cannot be used, since the aggregated data are not fields in that model."})
export class getSampleRecdVolByMonthOutput{
    @Field(() => Int)
    year: number;
    @Field(() => Int)
    month: number;
    @Field(() => Int)
    count: number;
}
For the sake of completeness in this training module, we will add a controller. This will keep the GraphQL query code succinct, while also demonstrating possible uses of this type of application service.
- LIM_SampleDetailsController.ts
- This class uses the
LIM_SAMPLEDETAILSPluginRepoto get data from the database, and then maps the data to thegetSampleRecdVolByMonthOutputtype, which can be directly used by the GraphQL query.
- This class uses the
import { getSampleRecdVolByMonthInput } from "../types/getSampleRecdVolByMonthInput";
import { getSampleRecdVolByMonthOutput } from "../types/getSampleRecdVolByMonthOutput";
import { LIM_SAMPLEDETAILSPluginRepo } from "../../../modelServices/repos/LIM_SAMPLEDETAILSPluginRepo";
export class LIM_SampleDetailsController {
    private sampleDetailsRepo = new LIM_SAMPLEDETAILSPluginRepo();
    public async getRecdVolByMonth(inputData: getSampleRecdVolByMonthInput)
    : Promise<getSampleRecdVolByMonthOutput[] | null> {
        const smpData = await this.sampleDetailsRepo
          .getRecdVolByDateRange(inputData.beginDt, inputData.endDt);
        if (smpData == null) return null;
        const response: getSampleRecdVolByMonthOutput[] = smpData.map(data => {
            return {
                year: data.year,
                month: data.month,
                count: data.count
            }
        });
        //console.log(response);
        return response;
    }
}
Finally, we have the GraphQL query.
- SampleData.ts
- The query method,
getSampleRecdVolByMonth, uses the controller above to simply return the data based on the begin and end date from the calling application. @UseMiddleware(auth)decorates the method to secure it. A valid JWT token must be supplied in the header.- type-graphql is again used to decorate the query for GraphQL. Note that the return type for an array in GraphQL is [Arrayname] where typescript returns a datatype[].
- Any errors are caught and handled by a utility that logs via the winston library. Log files can be found under src/logger/logs
- The query method,
import { Arg, Query, Resolver, UseMiddleware } from "type-graphql";
import { getSampleRecdVolByMonthInput } from "../appServices/types/getSampleRecdVolByMonthInput";
import { getSampleRecdVolByMonthOutput } from "../appServices/types/getSampleRecdVolByMonthOutput";
import { LIM_SampleDetailsController } from "../appServices/controllers/LIM_SampleDetailsController"
import { handleError } from "../../../utils/handleError";
import { auth } from "../../../middleware/auth";
@Resolver()
export class SampleDataResolver {
    @UseMiddleware(auth)
    @Query(() => [getSampleRecdVolByMonthOutput], { nullable: true, description: "Get sample recd volume by month" })
    async getSampleRecdVolByMonth(@Arg("data") inputData: getSampleRecdVolByMonthInput)
    : Promise<getSampleRecdVolByMonthOutput[] | null> {
        try {
            const smpDataCnt = new LIM_SampleDetailsController();
            return await smpDataCnt.getRecdVolByMonth(inputData);
        } catch (err) {
            return handleError("getSampleRecdVolByMonth", err.message, 'ERROR');
        }
    }
}
Errors
At this point, we have code that should work. It is never quite this straightforward, though, when building the code.
There are several ways to get information about various problems
- Using Visual Studio Code, or similar IDE, many errors will be highlighted as you code.
- There are a couple that can be ignored. In the author’s case, the require(“sequelize”) command was highlighted as problematic, but was not. However, outside of this, the IDE helps a lot.
- Winston logs in src/logger/logs
- Assuming that coding occurs with the development environment started, then you can use docker logs or docker service logs to see:
- console.log() outputs
- compile or similar errors
- When code files are changed, to verify that the restart is completed.
- Some examples: ( from cmd: sudo docker service logs <service>)

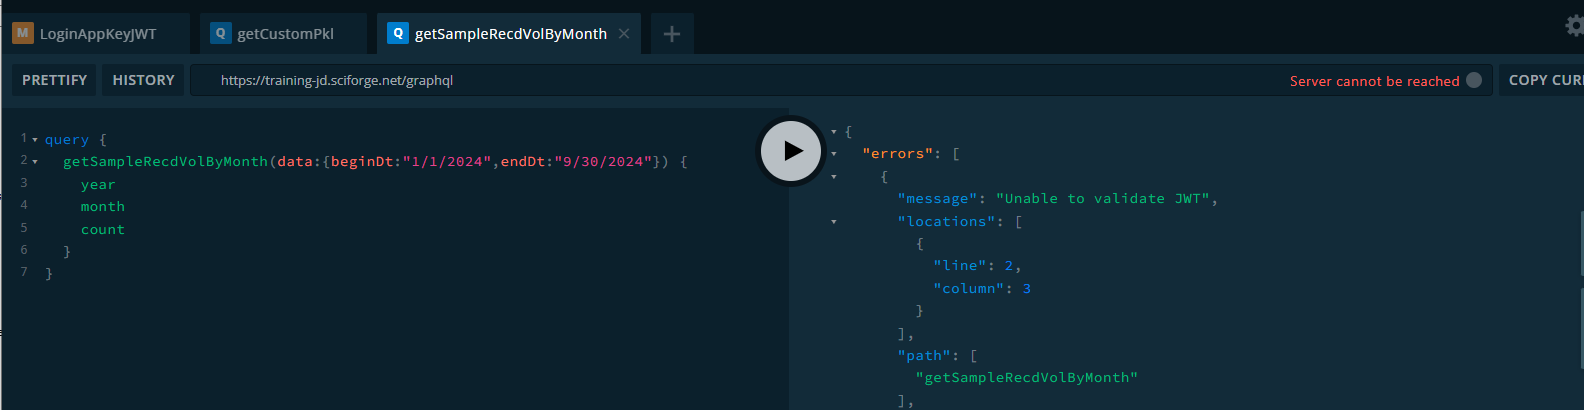
- The GraphQL sandbox, while testing. For example, if an invalid JWT is used when testing, expect the below. Another common example would be data type issues that successfully compile.
Testing
When the code has been built, and things successfully compile, it is time to verify that things work. The easiest place to do this is via the GraphQL Sandbox.
- Get a valid JWT token (see “Access with Application Keys”)
- See if your query or migration has the expected output or behavior.
If things go well, the query built above returns data:
- JWT token goes in the header as shown.
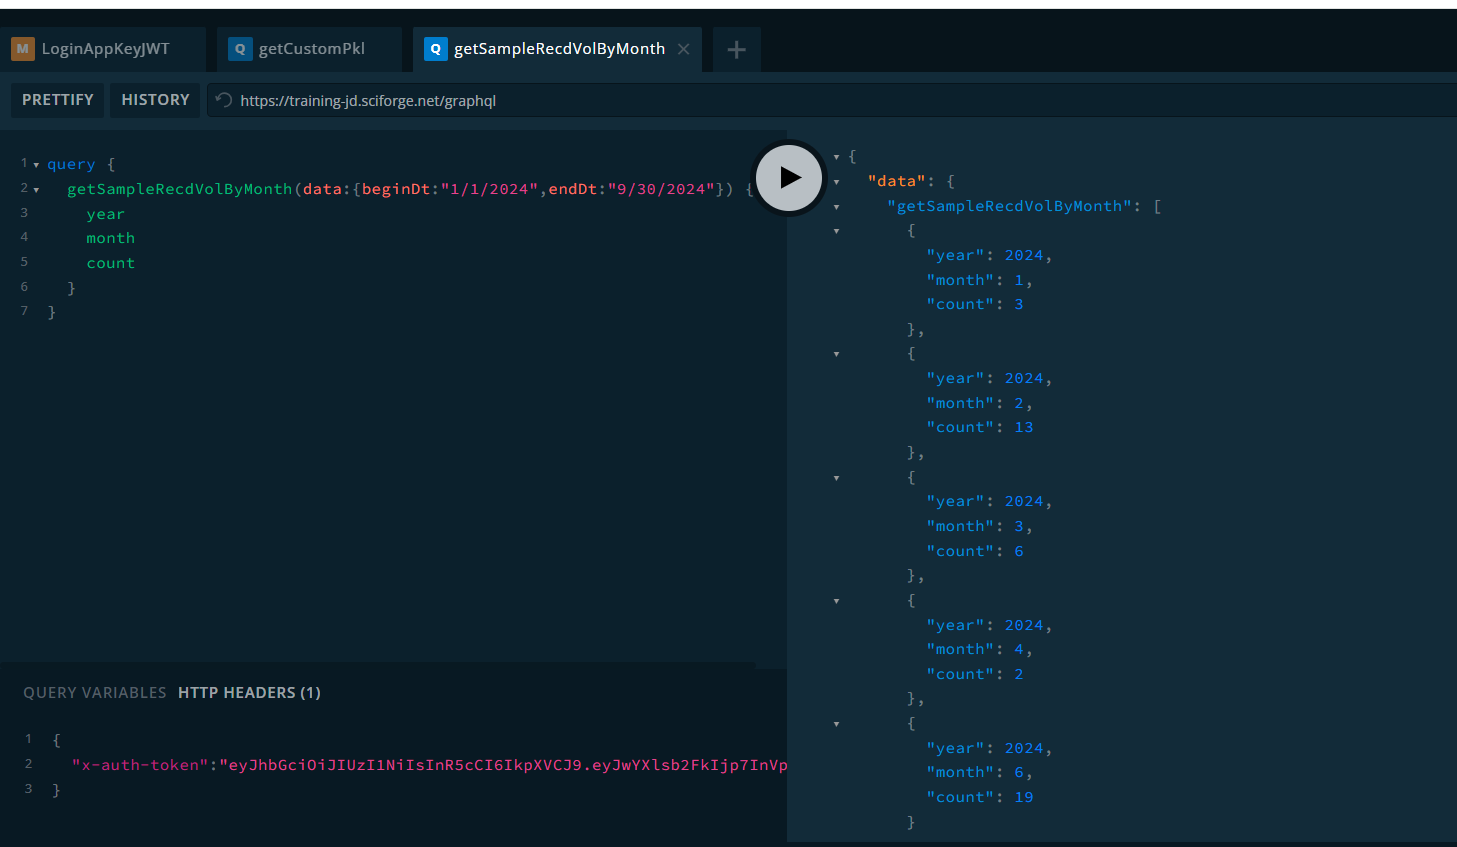
Other validation steps might include verifying that the SQL generated by the ORM is correct. This can be found in the docker service logs just after hitting the “play” button in the sandbox.
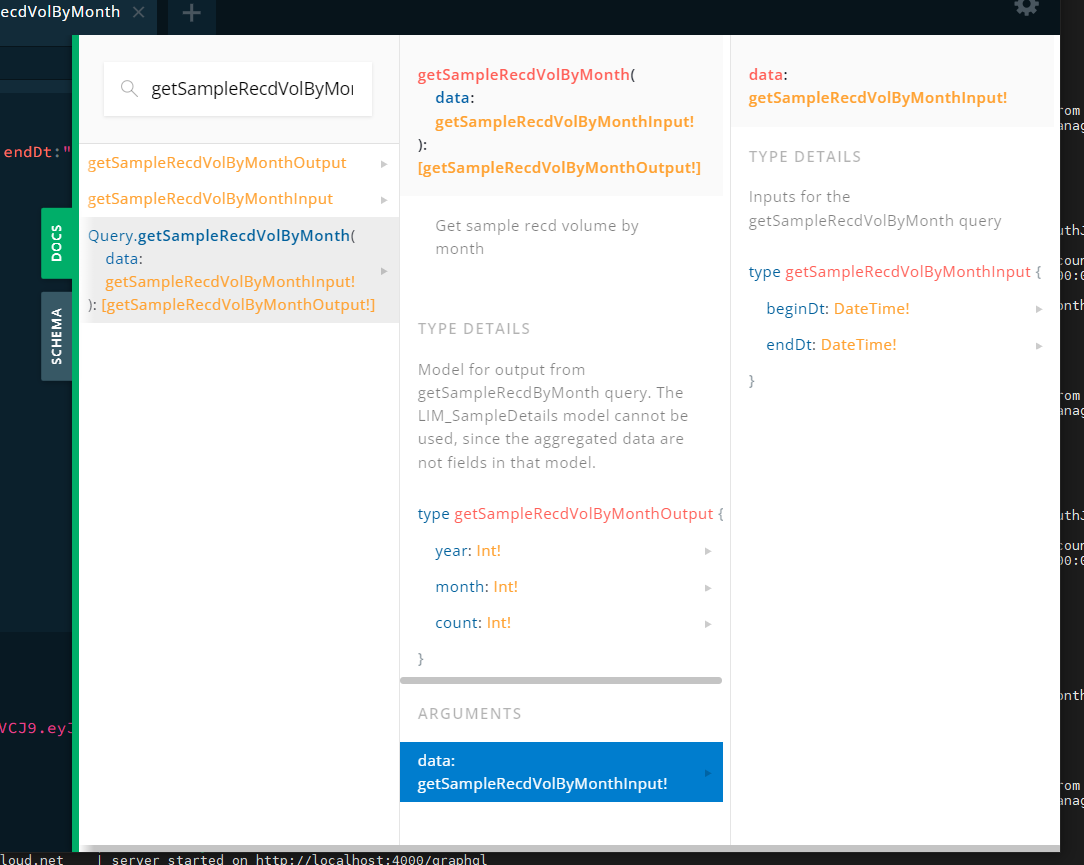
If at some point information about the query is needed, simply filter in the docs on the right hand side, as shown below. The friendly descriptive text is generated from the “description” attribute in the GraphQL decorators.
Promotion to production via the Plugin Pipeline
When the coding is done, the changes need to make their way to the production environment, so that the consuming application (ICWP in this case) can be coded to consume the new endpoint(s).
Commits, pushes, pulls and similar all occur in the git repository for the plugin.
- Stop the development environment
- Code should currently be in a development branch, or feature branch.
- Commit and push the code. This can be done as often as desired.
- Merge to the release branch. At LabLynx this is done by a peer, during the QC / code review phase.
- Resolve conflicts
- Test. If further changes needed, commit.
- Push.
- Lablynx will need to cycle the test environment, which will pull the latest plugin changes in the release branch.
- The test environment should now have the new code, and be tested to verify that the requirements are met.
- At LabLynx, this is verified by the peer that does QC. Where a client specifically requested the endpoint be built by lablynx, this is the stage at which client testing and approval occurs.
- Once all relevant stakeholders have verified that the endpoint works as required, merge the changes to the master/main branch. Conflicts should have already been resolved in the release branch/test environment.
- Lablynx will need to cycle the production environment, which will pull the latest plugin changes in the release branch.